This video was made to empower Veterans with acupressure self care strategies that may help relieve low back pain. You can follow along with this video as we show you the technique for seven acupressure points. You may perform the self care routine in addition to your regular medical care. It is not intended to replace standard medical treatments for this condition. This acupressure routine may not be appropriate for some Veterans, including those who have brand new symptoms or who are pregnant. It is best to sit or lie down while applying acupressure. If you experience any discomfort, dizziness, or other unusual symptoms, stop the acupressure immediately. If these symptoms do not go away, contact your medical provider. Do not use acupressure over areas where you have a wound, severe swelling or lump, active infection, recent blood clots, rash, or areas that are very numb. However, you may be able to use other points away from these areas. If you take medications to thin your blood or have a bleeding or clotting disorder, use only light pressure there.
Acupressure is thousands of years old and likely predates acupuncture, and it can be useful for a wide variety of conditions. When we have low back pain, we tend to put our hands to our back to help calm the pain. Putting our hands on areas that hurt and rubbing is a very natural thing to do. You will be shown how to do the acupressure routine by pressing or rubbing the points for 30 seconds each. I invite you to follow along on yourself as I demonstrate each acupressure point. Use the amount of pressure that feels comfortable to you. Enough pressure to cause some sensation, but if it's painful, just use less pressure. Sometimes a light touch is all that is needed.
The first point in this routine is called SI4. This point is on the pinky side of the hand, in the groove where the hand meets the wrist. If you bend at the wrist toward the small finger and natural crease will form in this area. We're going to work this point for 30 seconds. You can try pressing and holding, or you can try rubbing using small circles. Use the amount of pressure that feels most comfortable to you. The amount of pressure may be different for each person and may even vary at different times of the day. Many of these points can be done on both sides. In this video, we're only going to show you how to do the point on one side. If you would like to do acupressure on the same point on your other hand, feel free to pause the video and press or rub to massage the other side for 30 seconds, then resume the video when you're done.
This next point is called Ling Gu. It's found on the back of the hand, in the web space between the thumb and first finger. Draw your opposite index finger through the web towards the wrist and stop in the groove just before the area where the index finger and the thumb join together. Direct your pressure towards the wrist. You can press on this point in different ways. Try using your index finger like this. Or you can try a pincer grip like this. If it's uncomfortable to use your hands to press points, you can also try using a pencil eraser instead, like this. When you're pressing this area, you may notice a spot that feels more tender than others. You can focus your pressure on that tender area, but not to the point of causing pain.
Again, hold or massage this point for 30 seconds and pause the video if you would like to do this on the other side. The next location is found on the ear. Using your finger feel for the top of the ear where it folds over. Drop your finger down to where you find the next ridge which is in the top third of the outer ear. Use your thumb to pinch this spot like this. Or your index finger to press any tender spots along this ridge like this. You may try using a mirror to help locate this zone the first few times you massage this point.
You can rub this area on both sides at the same time if you are able to reach, and if it feels good. Or you can just press one side at a time. UB Low-Back Lines. UB Low-Back Lines are found about 1 1/2 inches on either side of the spine. Never apply pressure directly over the spine. You can use your fingers or your thumbs on these lines. You may massage or press up and down in a line along these areas. If one spot feels more tender than another, try spending more time pressing there to release the tension.
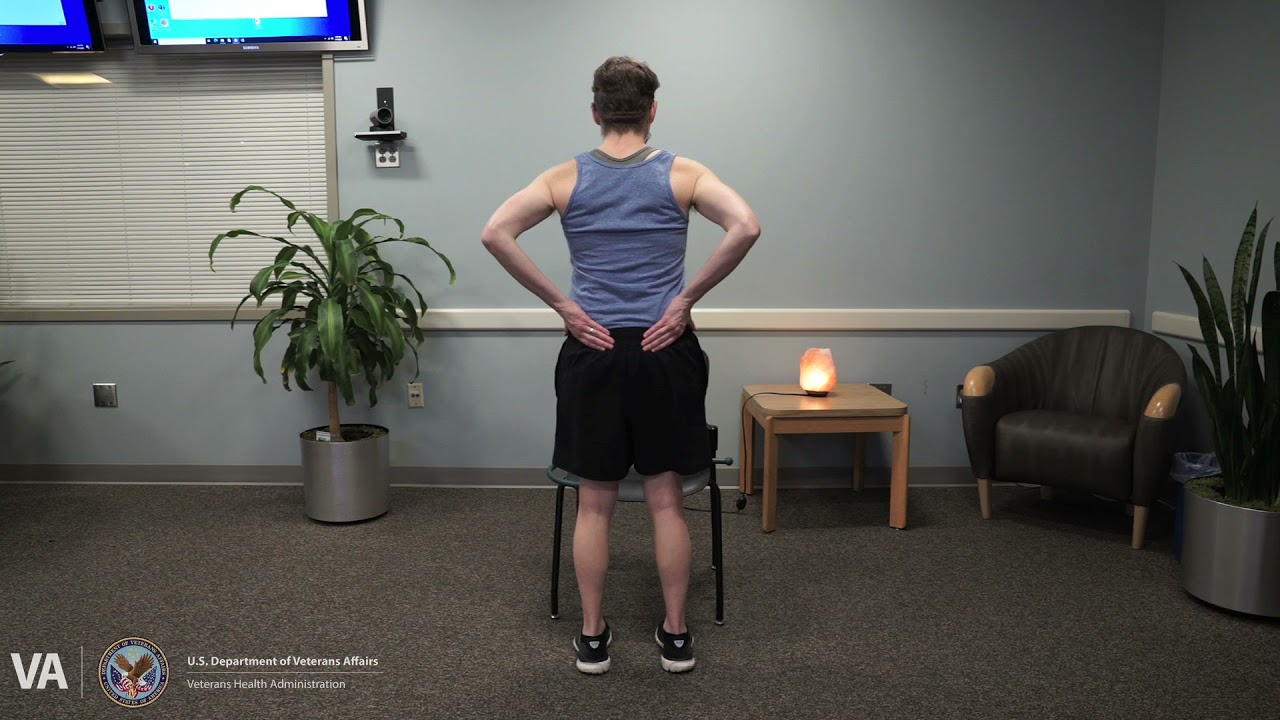
UB Low-Back Lines are also great places to use a massage device such as a TheraCane which can be issued by the VA. Place the hook end with the knob around the back. Put the knob onto a point on the UB Low- Back Line, and gently pull forward to apply pressure slowly. Again, be sure you are not directly over the spine or over a rib. Start off with a light pressure to be sure you are comfortable. You could also try using a ball against a chair. Place the ball into a long sock for better control. Put the ball between the chair and your back in this UB Low-Back Line area. Lean your body back on to the ball against the chair. Use the amount of pressure that feels comfortable to you. You can also ask a caregiver to do the acupressure in this area. Remember, don't push directly on the spine. Further down from the low back lines is your hip area where you can find points in the upper gluteal muscles that might also help with low back pain. There are many ways to work in this area. I'll show you techniques using your thumbs, fingers or fists.
Let's start by using the pads of your fingers. Reach around to the tops of your hips and then rub your fingers up and down as you work your way around to the sides of the hips. Play with different amounts of pressure to figure out what works best for you. Or you may try using your thumbs to massage this area. Start by placing your hands on the hips with your thumbs pointed towards each other. Apply pressure along those lines up and down, or again using small circles as you work your way out. Another option is using a loose fist. Make your hand into a loose fist and then use a light tapping motion against the body, moving around to several different spots. You can also use the VA issued Thera cane with a similar technique that you used for UB Low-Back lines down here. Pick the technique that works best for you and try to do the acupressure for at least 30 seconds throughout the area. You are encouraged to spend more time in this area if it feels good to do so. The next point in this routine is called UB 40.
This point is found at the back of the knee. To locate this spot, find the center of the crease at the back of the knee. Try sitting down to find this point. You can use several fingers wrapping around to the back of the knee to meet in the center and apply the pressure. If you still have trouble reaching this point, a caregiver can help here as well. If you cannot reach this point safely, just skip it and move on to the next. You can hold direct pressure, or try rubbing in small circles for 30 seconds, then pause the video. If you would like to do this on the other side. If you feel any numbness or a tingling sensation at this point, try using less pressure here. The final point in this routine is called. UB57. This point is found on the back of the lower leg, about midway between the ankle and knee at the lower edge of the calf muscle.
This is where the muscle of your calf starts to take shape. To find this point, try crossing your leg and use two thumbs to press this spot. Another way to press this point is to bend the knee while seated and reach down. Just as a reminder, you don't want to use acupressure over areas where you have a wound or sore, severe swelling or lump, active infection, recent blood clots, rash, or areas that are very numb. If this applies to your lower legs, just skip this point. Press and hold or massage this point for 30 seconds and pause the video if you would like to do this on the other side. That's the end of this acupressure routine for low back pain.
Feel free to use this routine several times a day as needed for relief. With chronic low back pain, you may or may not notice a change right away. Try doing this routine daily for a few weeks before deciding if it's helpful. It may take time to work for you. And remember, please pay attention to your body and do only what feels right. If you find certain points to be particularly helpful, try focusing on those spots. If you find other points to be uncomfortable or too hard to reach, just skip those points. Please look for other upcoming videos in our acupressure series. To download a handout with pictures of the acupressure points to use as a reference, please follow the link below.